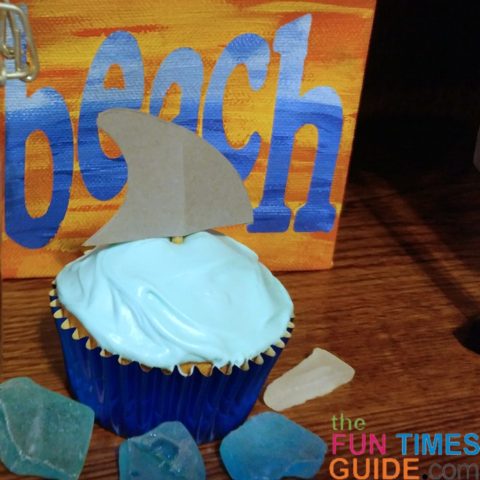
Shark fin cupcakes are an easy addition for a shark-themed party or to celebrate Shark Week.
Making shark themed cupcakes would be a fun activity to include the kids!
I recently made some for a party — so I thought I’d share a few tips I’ve learned and show you how to make shark fin cupcakes yourself.
Shark Fin Cupcakes Tutorial
Here’s what you need:
- cupcakes
- grey paper
- toothpicks
- glue stick
- liquid glue
- red jelly
- blue frosting (or white frosting with blue food color)
Step #1 – Bake the cupcakes.
I used a box mix to bake 24 regular white, vanilla cupcakes.
You can use any color, flavor, or size. But as you’ll see in a minute, something to go with “blood” will be the best!
Step #2 – Make the shark fins (while the cupcakes are baking and cooling).
Start with grey paper. You’ll be using 2 layers for each fin — so it doesn’t matter if you use construction paper, typing paper, cardstock, or whatever you have. You could also go with black paper, or have the kids use a grey marker or crayon to color white paper.
You have 3 options to make the fin shape:
 The easiest option is to just draw it! Practice on scrap paper until you have one you like. In real life, no 2 shark fins are alike, so there’s no need to make these perfect.
- Another option is to Google “shark fin” and look at the images there. Find one you like, print it, cut it out, and use it as your template.
- The third option is the one I used. Find a Google image you like on your phone, enlarge it to the size you want, and trace over it with white paper to cut your template. (The fin I used is 2 inches across and 1.5 inches at the tip.)

TIP: Now is the time to get your red jelly out of the fridge and let it soften.
Once you’ve cut out the shark fins (you need 2 fins for each cupcake), here’s how to use glue to add the toothpicks:
- Use the “front” of the 1st fin and the “back” of the 2nd fin (as seen in the photo below) and cover each with a glue stick.
- Use a tiny dot of liquid glue for the tip of the toothpick, and place it midway on top of one fin. Press the 2 glued fins together over the toothpick — to hold it in place.

TIP: Make sure the toothpick that is sticking out is shorter than your cupcakes — so that the fin will rest on top of the frosting.
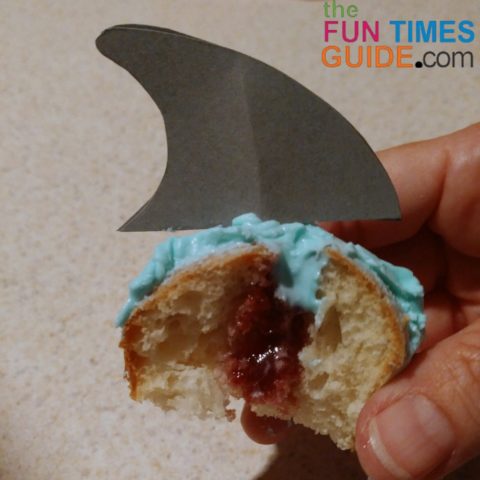
Step #3 – Add red jelly to the cooled cupcakes.
If you have one, use a cupcake corer to create the space for the jelly.
I don’t have one, so I used a straw.

Here’s how to use a straw to fill cupcakes:
- Poke the straw into the middle of the cupcake several times, making a nice little tunnel.
- Use a small knife or spoon to add the jelly to the tunnel – this should be easy since you let the jelly warm up a little bit!
- Fill the tunnel all the way to the top.

TIP: I used red raspberry jam, but any red jam, jelly, or preserve will work. And to keep everyone guessing, I only put jelly inside half of the cupcakes!
Step #4 – Prepare the frosting and frost the cupcakes.
I used 1 can of white vanilla frosting. You can use any flavor you like — or make your own.
If you use white frosting, you’ll to use blue food coloring to make the frosting look like water.
I grabbed one of several boxes of food coloring in my pantry
To color the whole can of frosting, I ended up using 7 drops of the blue color.


Step #5 – Add the shark fins to the cupcakes.
And you’re done!

TIP: Remember your cupcakes have jelly in them — so refrigerate until you plan to serve them.
My shark fin cupcakes were inspired from these homemade shark bite cupcakes.
More Shark Fin Cupcakes And Cakes
Here are some other resources to help you come up with your own clever shark cupcake ideas: